Unlocking Windows GUI Automation with Pywinauto: A Python Developer’s Guide
Introduction
Automation is a powerful tool for enhancing productivity, and Python, with its vast ecosystem of libraries, is a go-to language for automating tasks. While many developers are familiar with automating web tasks using Selenium or headless browsers, automating desktop applications can be just as rewarding and useful. This is where, a library for automating the Windows GUI, comes into play. In this article, we’ll explore how to harness the power of pywinauto to automate tasks in Windows desktop applications.
What is Pywinauto?
pywinauto is an open-source Python library designed to automate the graphical user interface (GUI) of Windows applications. Whether it's interacting with buttons, entering text into fields, or extracting data from the application, pywinauto can do it all. It allows you to control applications programmatically, making it a robust tool for testing, data extraction, or any repetitive task that involves a Windows GUI.
A Real-World Use Case: Automating QA Testing
In my work as a QA Manual tester, there was a turning point where automation became a necessity. My CTO approached me with a challenge: could we automate the QA testing of our GUI applications instead of doing it manually? Manual testing, while effective, was time-consuming and prone to human error. This was the perfect opportunity to explore automation.
After researching various tools, I discovered, that it turned out to be exactly what we needed. With this, we were able to automate all of our QA tests for the Windows GUI applications. This transition not only improved the efficiency and reliability of our testing process but also freed up valuable time that we could reinvest into other critical tasks. The ability to automate GUI interactions meant that repetitive tasks could be executed consistently and at scale, leading to higher-quality software releases.
Setting Up Pywinauto
Before diving into the automation process, you’ll need to install pywinauto. It’s straightforward and can be done using pip:
pip install pywinauto
Once installed, you can start automating any Windows application that exposes its GUI elements to the operating system.
Getting Started: The Basics
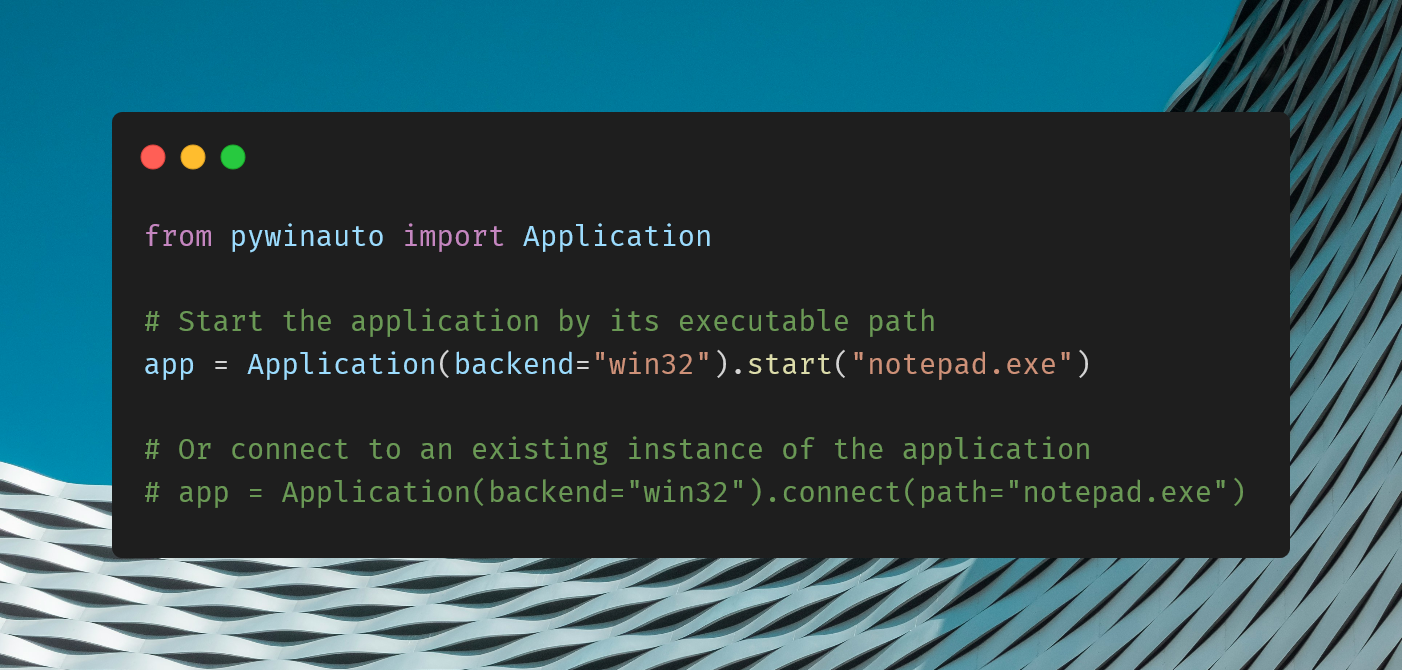
The first step in automating a Windows application is to connect to the application. Pywinauto offers a variety of ways to do this, depending on how you prefer to identify the application.
Here's a simple example:

The backend parameter specifies the method used to access the GUI elements. win32 is the most common backend, but uia (UI Automation) can also be used for more complex applications or those built using modern frameworks.
Navigating the GUI
Once connected, you can interact with the application by navigating through its windows and controls. Pywinauto allows you to access these elements using either the name of the control or by specifying its properties.
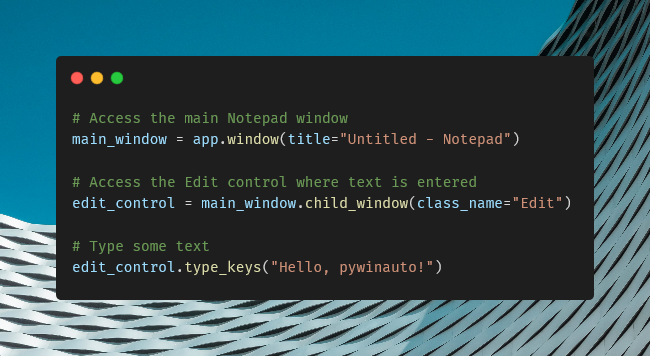
For example, to enter text into Notepad:

This script opens Notepad, types "Hello, pywinauto!" into the text area, and then leaves the application open for further interaction.
Handling Dialogs and Buttons
Dialogs, message boxes, and buttons are common GUI elements that you’ll often need to interact with during automation. Pywinauto makes this process intuitive.
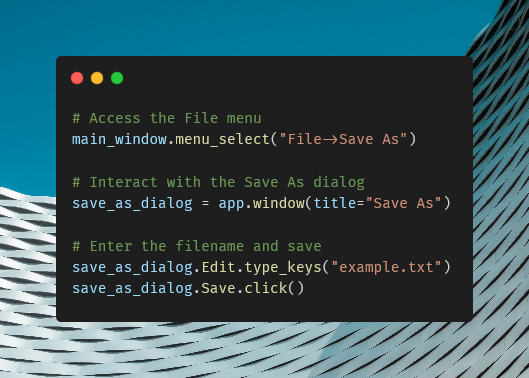
For instance, to save a file in Notepad:

In this example, we open the "Save As" dialog, type in a file name, and click the Save button. Pywinauto seamlessly handles these interactions, abstracting away the complexities of GUI automation.
Advanced Techniques: Handling Complex Applications
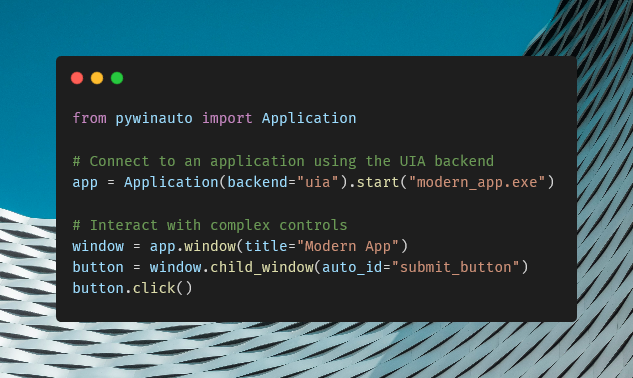
More complex applications, such as those with dynamic content or custom controls, pywinauto provide additional tools and methods to handle non-standard behaviors. One such tool is the UIA backend, which can be used to interact with applications that do not expose their elements through the traditional win32 API.
Here’s how you can use the UIA backend:

The UIA backend is particularly useful for applications developed with frameworks like WPF (Windows Presentation Foundation) or those using modern UI components.


Comments (0)